General settings
General settings section allows you to change the overall layout of account on the fly and to set other settings such as time zone, date format, permissions for certain account resources, and to configure the login page. To set general settings, go to Settings > General menu option.
Account title and layout theme

To set the account title and layout theme, enter the following values:
- Account title: The title of your account. It's is displayed in the header of account pages.
- Layout theme: Choose between several background themes that adjust navigation colors, titles and button styles.
Time and date
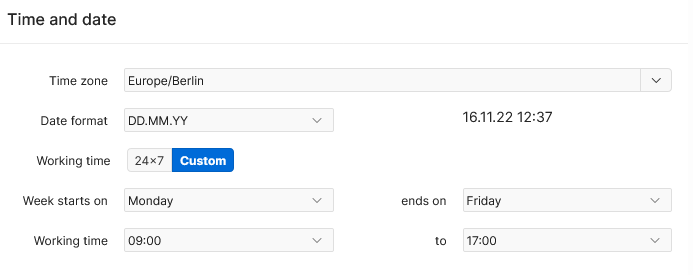
Time and date section allows you to adjust time correction and set the preferred date/time format:
- Time zone: If you're located outside of the server's time zone (UTC), select your nearest city from the select list.
- Date format: Select the preferred date and time format.
- Working time: Choose between Custom and 24/7. The Working time parameters are used to calculate Service Time Measurement values (Deadline, Response Time, Resolution Time), and to run the Workflow Scheduled actions within the defined working time. If you choose the Custom working time, you should also set the following values to deterimine the working time:
- Starting and ending day of the working week with Week starts on and ends on by selecting a day from the select list: Monday, Tuesday, ..., Sunday.
- Working time: Select hours in a day for the start and end of the working day.
Guest access
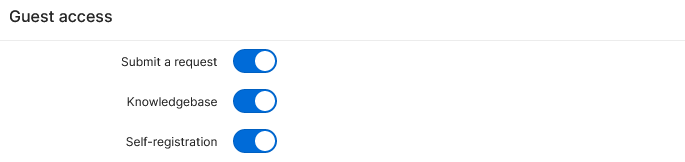
Depending on your organization’s requirements or support processes, choose between internal or external help desk. You can close the entire site to guest (anonymous) visitors or allow them submit a request, use the public knowledgebase article, and register themselves as customers/end-users.
Click the toogle switch to enable or disable access to selected pages and resources from the Login/Portal page for guest visitors:
- Submit a request: Public request submission form.
- Knowledgebase: Public knowledgebase articles.
- Self-registration: Customer's self-registration (Sign up) form.
Info
The initial settings allow access to requests' submission, public knowledgebase categories and articles, as well as the customer self-registration.
Self registration settings
Self-registration settings manage the way anonymous visitors can register themselves to SympoQ site as registered customers.
The Join form (Customer self-registration) can be accessed by the Join link from the Login page. In order to provide the customers' self-registration and the corresponding button/link, the overall self-registration process must be enabled in the previous Guest access secion.

The following options are available:
- Registration needs approval: Click the toogle switch if the customer self-registration needs to be approved by the site Administrator. Otherwise, each self-registered visitor is automatically registered as a customer. If the registration is needed, the following settings should also be set:
- Administrator: If your account has multiple Administrators, choose which of them should be notified about the new self-registration
- Add to Customer group: The self-registered customer will be added to the selected Customer group.
Registration form fields
The Join (Customer self-registration) form contains the following mandatory registration fields:
- Name (full), and
- Email address.
Along with the system enabled registration fields, you can add the following custom fields:
- Company name
- Website url
- Location data: Country, Region, Address, ZIP/Postal code, City
- Phone
- Mobile, and
- External ID.

To edit the Custom registration form, click Edit button and edit the popup form "Registration data". To add a new registration data:
- Click "Add Row" field
- Choose new field from the select list, and also choose whether the field should be mandatory or not - check or uncheck the Mandatory checkbox
- Click Save button.
Repeat steps above to add more fields to the form.
To remove a custom field from the registration form:
- Click the Actions menu icon in front of the field you wish to delete
- Choose Delete Row from the action list
- Click Save button.
Login page
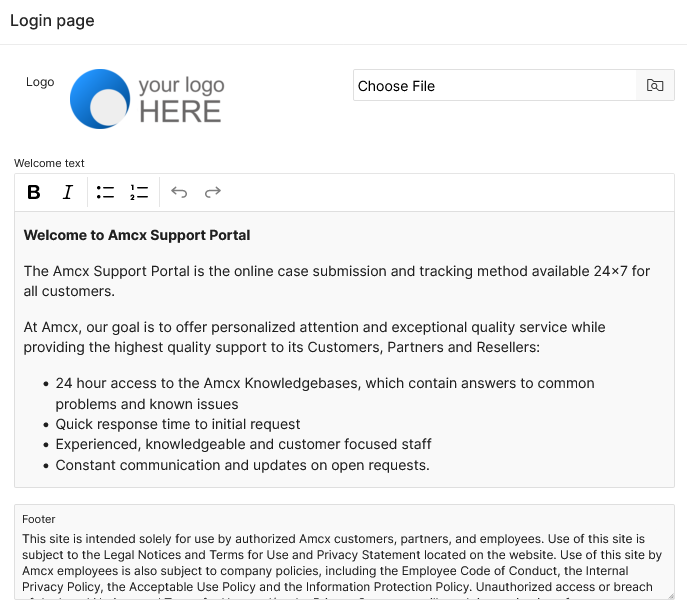
Edit the following values to adjust the Login page:
- Logo: Select the image file from your local disk. The logo image is displayed in the Login page header.
- Maximum file size: 300 KB
- Recommended width and height: 200px x 60px
- Image types: jpeg/jpg, png, gif.
- Welcome text: Free text displayed in the Login page.
- Footer: Free text displayed in the Login page footer.
Success
To confirm changes in the General settings page, click on the Save button.
About languages
SympoQ is a multilingual help desk application. Aside from English, the user interface is available in Spanish, Dutch, Arabic, German, and Portuguese.
Neither administrator nor users need to set preferred application language. The system automatically displays multilingual application interface based on user's browser language. For example, if the user's browser is set to Spanish ('es'), that user will see the Spanish version of the application.
Guides on how to change the default language in different browsers: