Ticket list
The Ticket list page displays all tickets that match the corresponding filter values. It also allows you to navigate through the ticket's Queues, download and print the list, and perform the ticket's bulk actions.

The ticket list page contains the following regions:
- Queue list to browse ticket Queues
- Search to filter the list
- Tickets.
Queue list
The Queue list appears on the left site of the Ticket list page. It's used to navigate through the ticket's Queues that agent has access to.
Along with each Queue name, the number of open tickets in the Queue is displayed, e.g. "Support (7)".
To navigate through the Queue list, click the Queue name. Afterward, the ticket list is reloaded to show the belonging tickets.
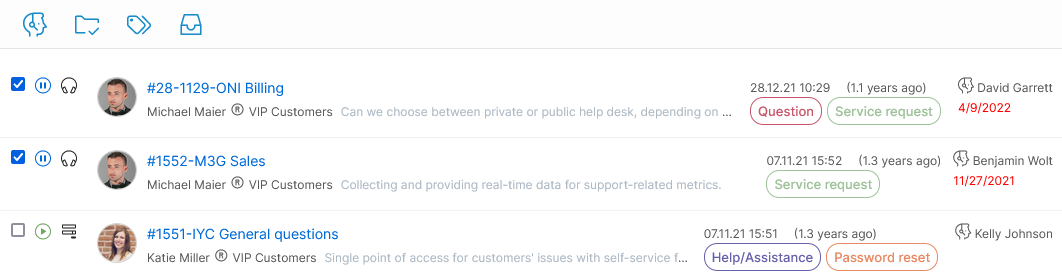
Tickets
The ticket list region displays a part of all tickets' information stored in the system. The tickets are displayed in order by the time submitted, from newer to older. Each row in the list is also the link to the ticket's details page
The following data are displayed:
- Checkbox - Invokes Bulk action on selected ticket(s).
- Status - The ticket status along with the status icon
- Submission channel icon: Web form, Email client, "Log a Call"
- ID and Topic - The Ticket ID and the topic concatenated with Subject, if the Subject is enabled.
- Submission date/time
- Customer - If the customer is registered, the name is concatenated with the registered mark "®"
- Description - Summary of the ticket description. On mouse hover, displays the tooltip with entire ticket description.
- Assignee with the deadline.
- Ticket tags, if avalable.
Search List
The Search region allows you to filter and search the list using the following values:
- Status
- Topic
- Customer group
- Assignee
- Submission period
- Overdue tickets - checkbox.
You can also search the list by a string entered in the Search field. The string is searched for in the following ticket's data:
- Ticket ID
- Customer name and email
- Subject
- Tags, and
- Description.
Search Messages
In addition to searching the ticket list with filter and search fields, you can also search all messages across all tickets. For example, you can search for a text in customer replies, agent replies, and in internal agent comments.
Click the Messages button bellow the Queue list, enter the search term and hit the Enter key.
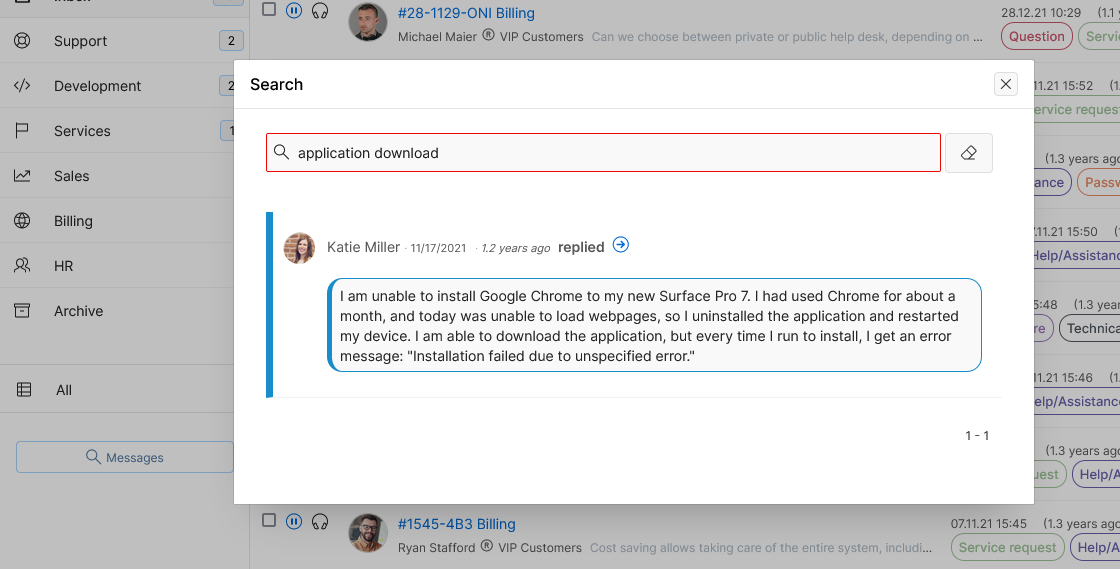
Afterward, the list of all messages containing the search term is displayed. You can navigate to the corresponding ticket if you click the ticket link icon .
Bulk actions
The bulk actions allow you to perform predefined actions on several tickets at once using the predefined action forms:
To perform a bulk action:
- Select one or more checkboxes at the beginning of a row to select tickets, or select the header checkbox to select all displayed tickets. Once you select tickets, the Bulk actions menu appears at the top of the list.
- Click the corresponding action button
- Proceed with the action as described bellow.
If you want to cancel any of the bulk actions, click the Cancel button in the corresponding action region.
Tip
To deselect one or more previously selected tickets, click the header checkbox.
Warning
The bulk actions don't perform Workflow rules on the selected tickets, neither send email notifications.
Assign

To assign selected tickets to the named agent:
- Select named agent from select list
- Optionally set the Deadline using the calendar control: select date, hour and minute, and then click the "Close" button within the calendar.
- Click the Assign button.
Note
The selected named agent must have access to Queue the ticket belongs to. In case they don't, the ticket will not be assigned to the agent.
Close

To close selected tickets, click the Close button.
Tag

To tag selected tickets:
- Select one or more ticket tags from the list
- Click the Tag button.
Move

To move selected tickets to a Queue:
- Select the Queue from the select list
- Click the Move button.
Note
If the selected ticket is already assigned with a named agent, make sure that the agent has access to the Queue that the ticket is moved to.