Ticket Details Page
The Ticket Details page provides a detailed view of a single ticket. You can review all ticket data, respond to the customer, perform predefined actions, and track every communication—both external (customer-facing) and internal (agent-only).
Page Layout
The interface is divided into 5 main regions:
- Header: Shows core identification and status info
- Details (Left-Pane): Displays remaining fields
- Actions
- Actions Log
- Customer Section.
Header Region
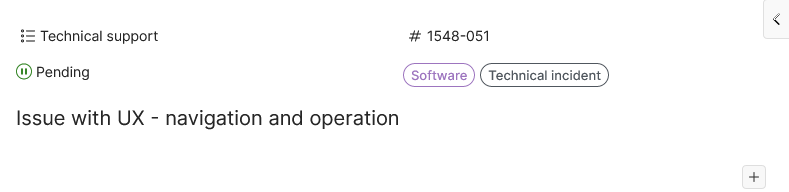
This compact banner at the top highlights the ticket's identity:
- Ticket topic
- Unique identification number
- Workflow status: New, Working, Pending, Closed
- Tags associated with the ticket
- Subject line, if enabled
- Description, collapsed by default, expanded via the (+) button.
Details Region (Left-Pane)
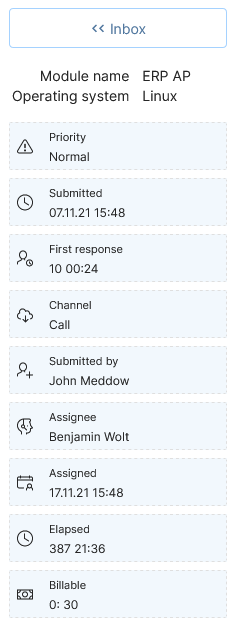
The lef-pane region displays data collected and updated during the processing:
- Navigation button: Returns you to the ticket list for this queue.
- Custom fields (if enabled)
- Submission fields: entered by the customer or by an agent using (via Compose Request form)
- Update fields: entered by an agent using the Update form or Compose Request form
- Priority: optional per topic configuration
- Submission date/time
- Submission channel: Web form, Email client, Compose Request form, Web widget
- Submitted by: customer name or named Agent
- Assignee and Assigned date/time
- Deadline, if set
- Elapsed: total time elapsed between the submission date/time and the date closed. If ticket is not closed, then takes the current date/time. Format: "Days Hours:Minutes"
- Estimated time remaining: difference between the submission date/time and the deadline. If deadline is not set, then takes the time/date when ticket is closed or the current date/time Format: "Days Hours:Minutes"
- Customer Rating: response rating give by the customer, if Customer permission "Rate agent replies" is enabled
- Total Billable time recorded
- Closed date/time when the ticket was closed.
Actions Region

The Action Region contains button menu for the following predefined actions:
Tip
Reply, Assign, and Close automatically trigger linked Automation rule, if configured.
To perform an action:
- Click the desired action in the Actions menu.
- The corresponding action form appears bellow the menu.
- Complete any required fields (e.g., response text for Reply)
- Click action button (e.g., Reply, Assign, Close) to execute or Cancel to abort.
Reply
To Reply to the ticket, place the cursor inside the reply text area and write the message.
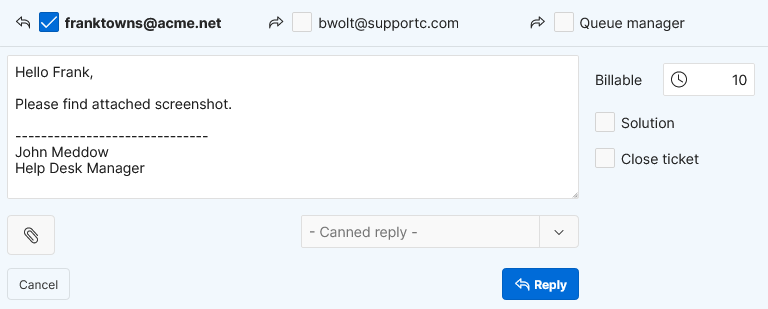
- You can optionally use a Canned reply:
- Click the - Canned Reply - and select the reply you want to load into the text area. You can edit the text as required.
- Enter optional information:
- Enable or disable sending email notifications to the customer, assigned agent or the Queue Manager by clicking the checbox in front of their email address.
- Billable: Add the time spent to the billable time (in minutes)
- Solution: Check to deem that this reply contains a text with a solution to the customer issue. The text is used for reporting in the Report builder, as well in the Intelligent solution feature.
- Close ticket: Check if you want to immediately close the ticket after the Reply
- Click the Attachment icon to add one or more attachments.
In the end, click the Reply button.
Info
Once the Reply form is opened, you'll notice the Signature text inserted in the text area. You can set the default signature text for yourself in the Profile, or in Users > Agents, Edit details ..
Assign

To assign the ticket to the named agent:
- Click Agent drop-down field
- Search and select the named agent from the list.
- Optionally, set the Deadline using the calendar control: select date, hour and minute, and then click the "Close".
- Click Assign button.
Tip
In the Agent list only named agents who have access permission to the current queue are displayed.
Close

To close the ticket, click the Close ticket.
Comment
The comment action allows you to add internal team comments, notes, instructions, and thoughts to the Actions log and also to make discussions with other team members.
The comments are not displayed to customers.
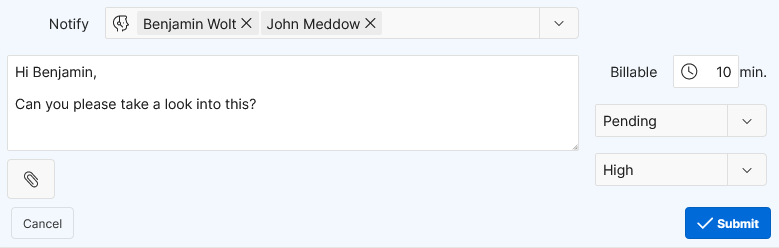
To insert a comment, place the cursor inside the text area and enter the comment.
You can optionally change or update the following data:
- Notify team members by selecting one or more named agents from the list. The selected agents will get email notification based on the Internal note email template
- Billable: Add billable time (in minutes)
- Change status - the ability to manually change the status can be disabled in Settings > Automation > Permissions, Agent permissions
- Change priority - optional per topic configuration
- Click Attachment icon to add one or more attachments.
Tag

To update ticket with tags :
- Click the Tags field to select one or more tags form the popup list.
- Click Tag.
Move

To move the ticket to a Queue:
- Click the Queue field
- Search and select queue from the popup list
- Optionally Unassign the ticket, if you need to reassign in a later stage.
- Click Move.
Note
If a selected ticket is already assigned with a named agent, make sure that the agent has access to the Queue that the ticket is moved to.
Update
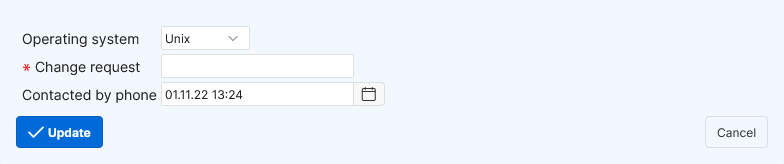
The Update action allows you to update specific information defined in the Update forms. If custom fields are defined for the current Topic, the Update form will display the custom fields. For each type of fields:
- Enter a value in text field
- Select a value from select list
- Enter date in calendar field.
To submit changes, click Update.
Delete
To delete the ticket, click the Delete ticket button.

Warning
The Delete is not reversible.
You must have Queue manager permission to Queue that the ticket belongs in order to delete selected ticket.
Actions Log
The Actions log shows the log of all ticket actions and events: requests submissions, customer and agent replies, internal notes, assignments, notifications, attached files, and other changes. The log is displayed in the order of occurrence, from newest to oldest.
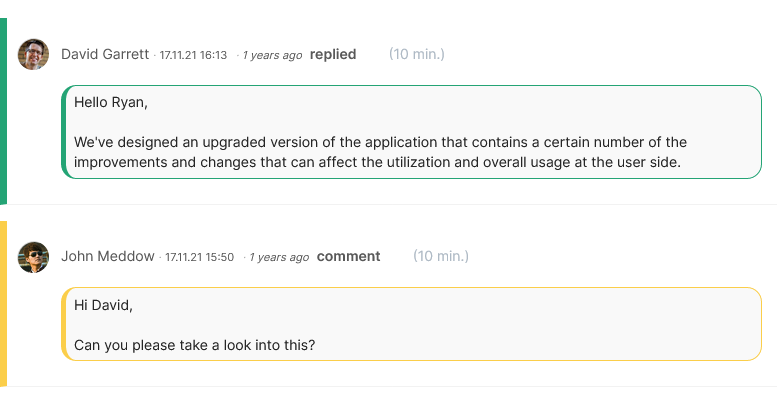
Each record contains the following data:
- Performer avatar/photo and their full name (either Agent or Customer)
- Action name: e.g., replied, comment, closed
- Date/time of the action
- Billable time (in minutes)
- The message text, if exists.
The log also displays results of automated actions performed on the ticket (set by the Automation rules:
- Email notifications
- Changes and updates as a result of Scheduled actions: Assignments, Deadlines, Queue changes, Status changes, and changes in Priority.
Customer Section
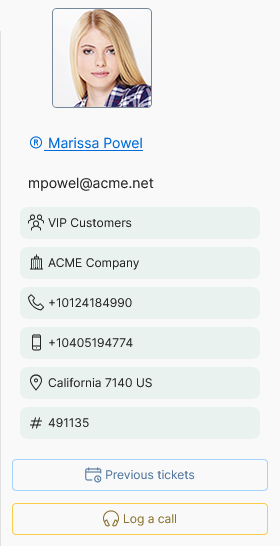
The Customer region contains information about the customer who submitted the ticket:
- Customer name concatenated with the registered mark "®". The name is also a link to the customer's details page
- Active checkbox that shows whether the customer is active
- All other available information: Customer Group, Role (Customer or Manager), Company, Login (Username), Country, Region, Address, Phone, Mobile, External ID.
If the Customer is not registered, it displays customer's:
- Name and
- Email address.
The Customer region contains two buttons:
- Previous tickets: Click to display popup window with the list of customer's previous tickets
- Compose Request: provides the ability to compose a request for the current customer.