Request Submission and Ticket Update Forms
Dynamic forms allow you to collect structured information from customers or internal teams through customizable submission interfaces. They are the primary way to collect, organize, and manage information from both customers and agents. Administrators can optimize structured templates that ensure requests are submitted with the necessary details.
Dynamic form may contain different field types such as:
- Text inputs
- Dropdown selections
- Flip switches
- Date and time fields
- File attachments.
Topics
Every form is tied to a Topic, which represents a category of requests. Topics allow you to:
- Customize forms per topic to capture the most useful information for the request category
- Control visibility so customers only see relevant topics.
The Topic select list is displayed at the top of a request submission form. It's the only mandatory field along with the request Description.
Note
When the Submission form is provided to a guest/anonymous customer, they also must enter their Name and Email.
Administrators can be set topics up around specific categories of requests or internal departments, ticket queues, etc.
Examples of topics include:
- Software company
(*) Question
(*) Feedback
(*) Bug
(*) Issue
(*) Billing
(*) Request for quote
(*) Request for contact
- HRM services
(*) Benefits
(*) Compensation
(*) Employee Relations
(*) Labor Relations
(*) Payroll
(*) Talent Acquisition
(*) Worker's Compensation
- General services
(*) Support
(*) Maintenance
(*) Development
(*) Sales
(*) Billing
(*) IT
(*) Delivery
To manage topics, go to Settings > Forms.
To edit an existing topic, click its name, or click (+) Add Form to add a new topic.
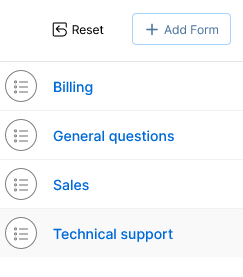
In the topic dialog, specify:
- Name: Enter unique topic name
- Active: Leave toggle on to show the new topic.
Click Create to create a new topic or click Save to apply the changes.
Submission Forms
Once the topic list is defined, the corresponding Request submission form can be designed to suit the specific needs for information.
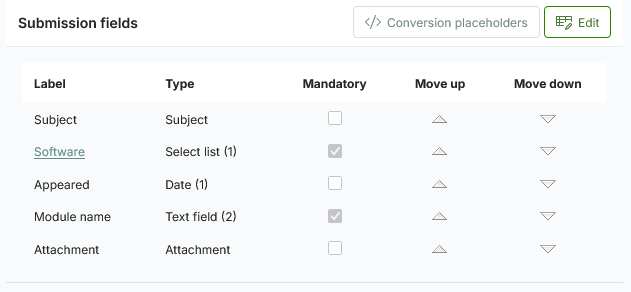
You can add different types of the form fields. The following system fields are available:
- Subject (text entry)
- Attachment (multiple files).
You can also add up to 20 custom fields per Topic with a maximum of 5 for each type:
- Text (free text entry)
- Select list (list of values)
- Flip switch (Yes/No)
- Date (calendar picker).
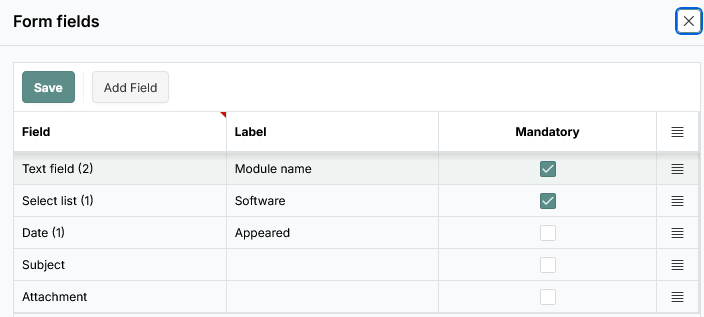
To add a new field or edit an existing one, click Edit. In the Form fields popup:
- Click Add Field
- Choose Field type
- Enter Label
- Choose Mandatory if the field is required
- Click Save.
Tip
The Label does not apply to Subject, Priority, or Attachment.
The Mandatory cannot be set on the Attachment.
To reorder Custom fields:
- To move a field up, click the
 up arrow
 - To move a field down, click the
 down arrow.
Note
You must Save the changes to continue to add the Select list values.
You must log out and log in again to make the form fields active.
List of values
For the Select list field type, click the Label name to open the popup form and edit values. To add a new value:
- Click Add
- Enter the new value
- Click Save.
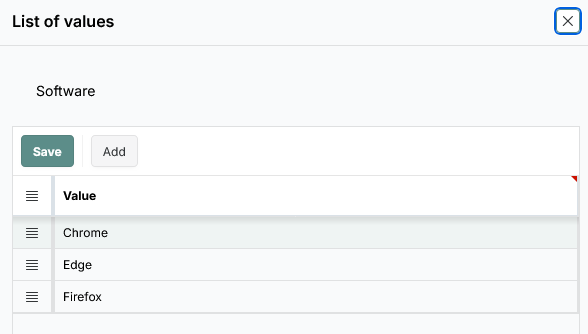
To delete a value:
- Click the Actions menu icon in front of the value, choose Delete Row, and click Save.
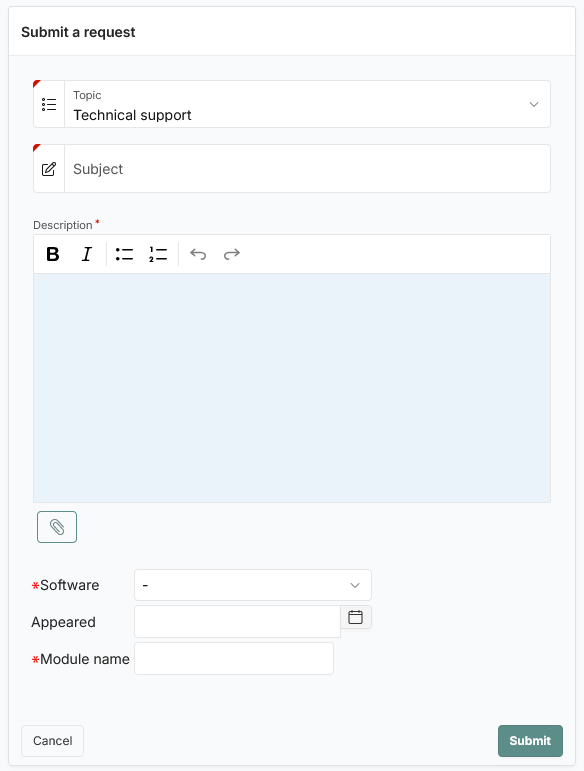
The resulting example provides the following data:
Ticket Update Forms
The ticket update forms fields allow agents to update ticket information with specific data not visible to customers in the following actions:
Up to nine fields per topic can be defined (maximum three for each type):
- Text (short text entry)
- Select list (list of values)
- Datetime fields (calendar and time picker), and
The Priority field can also be added. However, the ticket Priority can be changed in the Comment action (Change priority), rather than in the Update action.
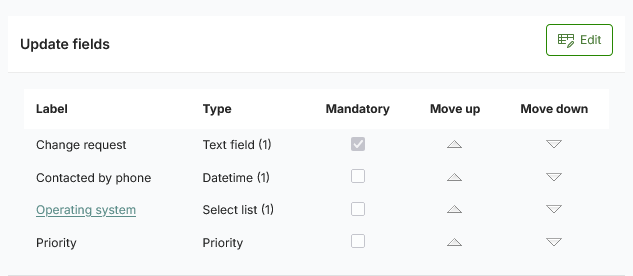
To edit fields for the selected topic, click Edit and follow the same steps as in the Submission Form Fields.
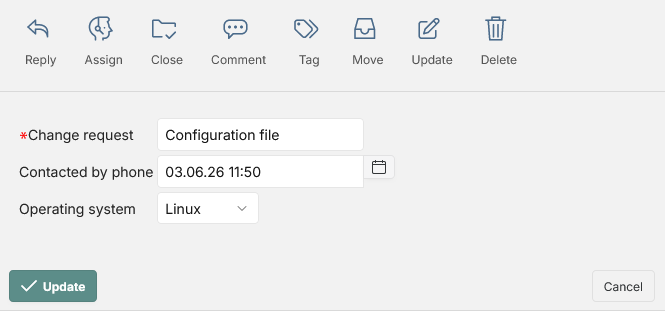
The following image shows an example of the update form.
Form submission via email
Along with the regular email-to-ticket utility that converts incoming email messages into the ticket data, it's also possible to populate the custom submission data via the common email service.
Those email messages are usually generated and sent by a third-party system sending various alerts and notifications that need attention from your team. The only necessary requirement is that the email message contains placeholders in a given format. Whenever an email message arrives, the email-to-ticket utility appends custom field values to the ticket, along with other email attributes: subject, date/time, sender name and address, priority, and attachments.
The set of placeholders is defined specifically for each submission form. To obtain the email conversion placeholders:
- Click Conversion placeholders. The popup form displays the corresponding placeholder's list.
- On the email sender's side, put the placeholders at the beginning of the email body, one beneath the other. The rest of the email body will be regularly converted to the ticket message. For example:
{placeholder 1#value 1}
{placeholder 2#value 2}
...
message
The first placeholder is mandatory at the beginning of the email body and overrides the Default Topic defined in Settings > Inbound email settings, e.g.:
{FORM#149}
Subsequently, similar placeholders for text fields, select lists, flip switches, and date fields are listed, if defined for the selected topic:
- Text fields:
{FIELD_1#Sample text value}
{FIELD_2#Sample text value 2}
- Select list fields
{FIELD_6#441}
{FIELD_7#157}
- Flip switch fields: to populate with Yes, set the value Y, and similarly, to populate with No, set the value N:
{FIELD_11#Y}
{FIELD_11#N}
- Date fields
{FIELD_16#17-Jan-26}
{FIELD_17#26-Oct-26}
Note
The date format must match the one you set in the General settings section.
Foe example, ff the custom submission fields exist in the Technical support form as in the screenshot above, then the email body should contain:
{FORM#3098}
{FIELD_16#17.01.26}
{FIELD_2#Reporting}
{FIELD_6#178}
This is an automated notification alert from Configuration Manager.
Warning
Placeholder's values are specific and unique for each Sympoq account. The values above are for the reference only.